Y'all I ain't gonna lie. It has been a hot minute since I've been an ELA teacher, 3 school years in fact. I enjoyed my time teaching science and math, as I feel like that is my stronger content, but the past 60 few days teaching all subjects has been a pretty fun challenge. 


We had been working with cause and effect, and I really wanted to challenge my kids. I work at a PYP (Primary Years Programme), and we really encourage thinking globally, creating inquiry based lessons to challenge the students with real-world tasks and problems. When I first kicked off cause and effect, I showed 3 different images and had students turn and talk, as to what they thought the connection was with the items. I showed them a stove, a pumpkin, and an empty pie pan. I wanted them to make the connection of pumpkin pie. On day 2 I showed them 3 more images, candles, a cake, and balloons, and wanted them to make the connection of a birthday party. I created this interactive making connections you can use whole group, or send to your students through google classroom and have them complete it. Then I had them create their own clues, and within one of our centers, students used post-it notes to guess what the connection of their classmate was. 


Our overall unit has been about Energy, and our first line of inquiry has been the different forms of Energy, so one of the books I read aloud to the students was 


Then the next day, I placed 9 different brown paper bags around the room. I had the students work with partners (works out since I have 18 students currently), and set the timer for them to spend 2 minutes at each bag. They looked at the items in each bag (around 3-5 items) and they were to determine what the connection was. 


A few days later I placed different effects around the room, and had students worked with their partner to once again travel to the different bags and write on sticky notes what were the causes of the effects. 


Then we went back to the book we read aloud, Energy Makes things Happen, and I gave each group a page and they were to find a cause/effect relationship from the page they were given.


I gave them around 7-8 minutes to find this in their text and label the cause and the effect. They did really well! 

Finally, I had them think about all the different cause and effect relationships we had talked about over the course of the last few weeks. We shared out some we remembered, and then I had them write one down to add to our anchor chart shown below.


You may like:


Before you can jump right in and teach students multiplication, you have to make sure they have a strong basis of odd, even, and arrays. But where do you start? It can be quite overwhelming, but if your students don't have a strong grasp on these concepts, results to teach them to multiply will end miserably.

But don't worry, I have some tips that worked for me, and I thought I'd share so more students could benefit from these ideas!


 My first tip is to incorporate literacy into your math block. These books are perfect for teaching odd and even and the beginning of arrays.


Day 1 and 2 we are building conceptual understanding, so I do not have any literacy text those days.

Day 3 of my Odd and Even activities, we read Even Steven and Odd Todd. After reading the text, students work with a partner to sort items from the text on their recording sheet. We then meet back to discuss why different items are odd or even. I finish off by giving them an exit ticket.

Day 4 we read One Odd Day by Doris Fisher. Afterwards students used the 20 sided dice mentioned below to shade in 4 different towers, and then wrote about what makes a number even.

Day 5 we read My Even Day by Doris Fisher. Students then used the square tiles to scoop and complete the chart on the number of tiles they scooped. 

Other great titles are Two of Everything and A Remainder of One. Both great for introducing leftovers when in groups and groupings of 2.


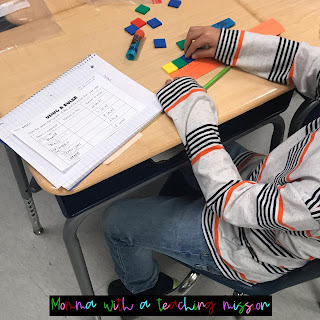
 We used these square tiles the first day to create rectangles that were 2 squares wide with different amounts. We noticed that some numbers were not truly rectangles because there was always one square that didn't have a partner (resulting in being odd because there wasn't two equally divided groups).


We used the snap cubes, also known as unifix cubes, for a few different purposes. We created chains up to 20. We choose a number card (1-20), but you could also use the 20 sided dice to roll to get a number. The students built a chain with that many snap cubes, and they would attempt to break the chain in half, or as close to half as they could. If the number was even, the splits would be equally halved, but if the number was odd, one chain would always be one more cube than the other. We wrote our even numbers in the even circle, and our odd numbers in the odd circle. Then they answered what is always true about even numbers, and what is always true about odd numbers.


I love these 20 sided dice! The standard in 2nd grade is telling odd and even up to 20. So we rolled dice, and then colored in the towers on our sheet and determined if the numbers were odd or even!


We used these square tiles again to scoop and determine odd or even! We wrote the amount, circled Yes or No for can I get to this number by counting by 2s, and then we determined how many leftovers there were. (which they figure out that it's always going to be 0 leftovers for an even number, or just 1 leftover for an odd number).


All the activities I've referenced above, along with the lesson plans, are included in this Odd and Even Pack.

https://www.teacherspayteachers.com/Product/Odd-and-Even-2OA3-4594250


From here, we will be starting arrays, so stay tuned for what we do for that in my classroom!!

After two marking periods of place value, adding and subtracting three digit numbers, our third marking period starts with measuring. Measuring lends itself nicely to a variety of read alouds! I admit that every book I recommend for this unit, I own! 


Our first unit in our third marking period covering three standards. In Maryland, we follow the Common Core State Standards and those that we cover are 2.MD.1, 2.MD.2, 2.MD.3. 2.MD.1 is measuring the length of an object by selecting and using appropriate tools such as rulers, yardsticks, and measuring tapes. 2.MD.2 is measuring the length of an object twice, using length units of different lengths for the two measurements; describing how the two measurements relate to the size of the unit chosen. 2.MD. 3 is estimating lengths using units of inches, fee, centimeters, and meters. 

To 'kick-off' our unit on measurement, we read 'Inch by Inch' by Leo Lionni and then students made posters about items that were about 1 inch long. 


The next day we created inch rulers by using sentence strips (which I halved vertically and then cut into 12 inch strips) and we lined up 12 square array tiles, which just so happen to be 1 inch square! The following day we used our rulers to measure different items in the classroom, but estimated them first! 


The next two day we discussed how 12 inches equals 1 foot, and then 3 feet equals 1 yard. We also read the book Super Sandcastle Saturday (a Math Start book). We used yardsticks and rulers. 


We measured baskets of stuff, and they had items of things they had to decide which unit of measure they should measure with--inches, feet, or yards. 

We then read the story How Big is a Foot (Rise and Shine), and we talked about standard units of measure being the same everywhere. The reason we don't use actual feet is because our feet are different sizes. Then the students did an activity with making a bed for the apprentice. We didn't have enough room in the classroom for this, so we moved into the hall!


The next lesson we got out the measuring tapes and read a very fun story, Jim and the Beanstalk, which mentions beer on one page, so I to cover the word beer with my finger and change it on the fly when I was reading, because I had forgotten it said that! We then used the measuring tapes to measure different items in the room. 

The next lesson we switched gears and I introduced centimeters. We read the Math Start book Pollys Pen Pal and we discussed the English System of measuring versus the Standard System of measuring. We then used the ones units from our base ten blocks, to create centimeter rulers (because those ones units are the size of centimeters!). 

The next few lessons looked similar to the inch/feet/yards lessons. We measured different items with centimeters, talked about 100 centimeters equaling 1 meter, and used the reverse side of the measuring tapes to measure in centimeters. 


Here's some other great literacy connections to read to kick off, or hook, your mathematics at the start of your math lesson.  Math Counts LengthLet's Measure ItHow long or how wideIs a Blue Whale the biggest thing there is?If you Hopped like a frogBiggest strongest fastest


For our summative assessment, I created a project based activity. My students love dogs, so we started by reading Measuring Penny. They then were assessed on the three standards that we had devoted so much time on! 


The students got to pick two dogs to compare and then decide which size dog houses they would need based off the dogs measurements and the dog house measurements. They also had to measure some chew toys, think about reasonable measurements, and measure dog houses. 


 If you are interested in my project based learning activity with dogs and their measurements, make sure you check out:


Or if you are interested in the activities and recording sheets mentioned in this blog be sure to check out:


Back to Top